


Punch needle is everywhere—and we can’t get enough! Follow along as DeSerres expert Lucie Vervaet teaches you this embroidery embossing technique. So relaxing, it almost seems magical!
MATERIALS:
- Embroidery hoop
- Punch needle canvas
- punch needle (5 mm)
- Wool
- Pencil
INSTRUCTIONS:
Step 1 :
Using a HB pencil, draw the inner contour of the embroidery hoop (this will serve as a template on the fabric). Within this template, draw the different elements that will make up the landscape.

Step 2 :
Place the fabric on the base hoop. Install the second part of the hoop (the one with the screw) on top. Press firmly on the top hoop so that the fabric gets stuck between the two hoops. Tighten so that the fabric is stable when working.
Step 3 :
Gently slide the wool into the punch needle using the long wire provided.
Step 4 :
Position the punch to be at approximately 45 degrees from the fabric. With the metal tip opening facing upwards, the tool goes in and out of the fabric. Move forward a few millimetres, then pierce the fabric again with the tool in the same position. Always make sure that the wool can slide freely inside the punch handle.

Step 5 :
Embroider the contours of the drawn elements, then do the interior.

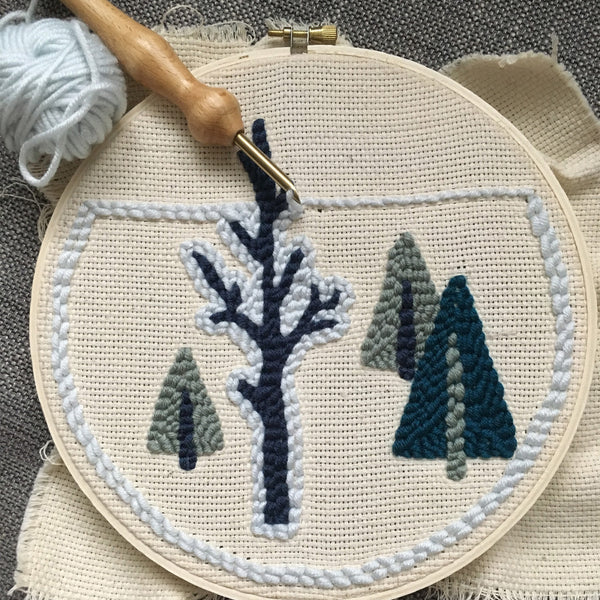
Step 6 :
To change the wool colour, simply cut the strand at the back of your creation, then insert the new colour into the tool.

TIPS
- Not used to freehand drawing? In step 1, graphite paper can be used to transfer the chosen design onto the fabric.
- For tight loops, the punch must remain very close to the canvas when working. For looser loops, move the tool away between each stitch entry and exit.