


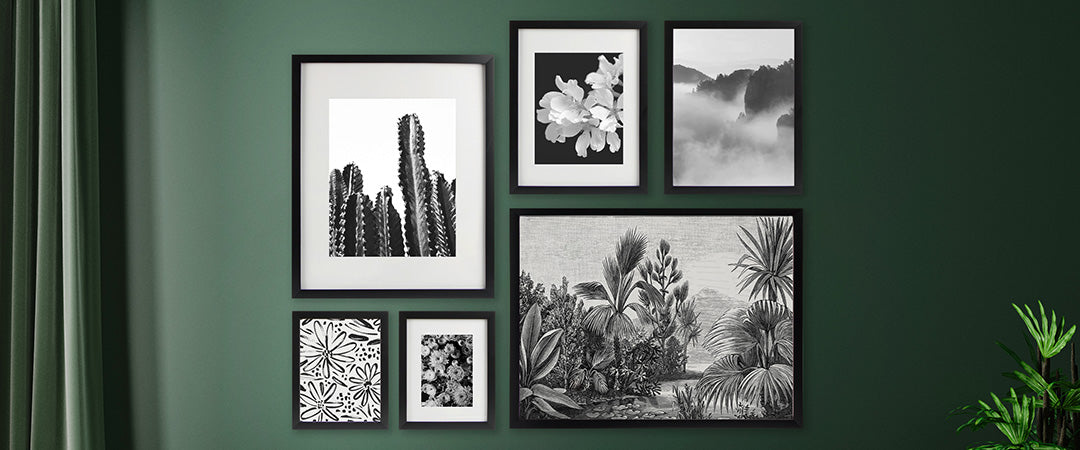
It all starts with the artwork: there is a frame for every type of artwork and an associated mounting process. Several types of prefabricated frames allow you to mount your own artwork in a variety of standard sizes.
FRAMING PAPER ARTWORK
Paper work of art, such as photographs, pastel and charcoal drawings, are more fragile than those on canvas. Moisture, insects, dust particles, light and UV rays are among the worst enemies for paper, and they can easily compromise the conservation of artwork.

The most suitable types of frames for paper artwork include photo frames, poster frames and double glass frames. Some of these come with a mat, which allows for multiple-size framing.

Mats enhance artwork; they create a space between the artwork and the frame to provide a focal point.
Made of cardboard, mats have a bevelled opening that surrounds the subject to be framed. They have two functions: practical and aesthetic. They protect works of art by creating a distance between them and the protective glass (particularly useful for pastels, charcoals and glossy photos or papers). They can also be customised in terms of size and colour, making them a great asset to your framing.
In order to provide our customers with more framing possibilities, we also offer pre-cut mats. Available in standard photo sizes, they fit into most pre-made frames. Treated with calcium carbonate, they are acid-free and lignin-free. They will not alter the artwork on which they are placed. A glass pane should always be used with a mat, as the cardboard is sensitive to humidity and needs the support of the glass pane to remain straight.
How do mats work?
Choose a mat with the appropriate opening for the size of your photo. To install, place the mat face down (or against a table). Place your photo on the back of the mat, centred in the opening. Once everything is centred and straight, attach the photo to the mat using two small pieces of acid-free tape, only at the top. Once the frame is on the wall, gravity will naturally cause the paper to relax downwards, but if there is tape on all sides, this could create ripples. Once the photo is in place, insert into a frame that matches the outer size of the mat you've chosen.
How do our 2-in-1 frames work?
It depends on the frame model, but the smaller size always fits the size of the mat opening (the size of the photo) and the larger size fits the size of the inside of the frame. If you remove the mat, you can put a larger photo in it, which gives you two options.
Example: a 4" x 6" photo in the 1st mat or an 8" x 10" photo without a mat
Other frames offer a more modern look, such as double glass frames. With these, mats cannot be used, as the wall on which the frame is hung will appear around the framed subject.
FRAMING A PAINTING
If you are looking for gallery-style frames for your artwork, floating frames are for you.
As their name suggests, floating frames are designed in such a way that your artwork appears to float within the frame, giving viewers a sense of 3D depth.
Floating frames feature a front-loading design (the canvas is dropped in from the front), leaving a gap between the frame and the artwork. This type of frame is perfect for anyone seeking a minimalist, contemporary look.
Traditional frames feature a back-loading design: the frame rests directly on the edges of the painting, so that it fits the image perfectly.
Note: with both floating and traditional frames, a canvas should only be framed when it is completely dry.
One of the main advantages is, of course, the added style of a floating frame, compared to artwork that is displayed without a frame.
Regular canvas frames come in a variety of designs, from classic to contemporary, and are available with and without an inner frame (Marie-Louise).
The Marie-Louise is used as a kind of mat with a predefined size. You cannot change its width like you can with a mat. On the other hand, it frees the artwork, giving viewers the impression that they are looking at it through a window. It also allows the focus to be on the artwork rather than the outer moulding. Depending on the artwork, a Marie-Louise can really brighten up a piece.


HOW TO MOUNT YOUR FRAME
Here you'll find a few tips for mounting your work on paper or canvas in different types of frame.
Photo frame/paper artwork:
Turn the frame over and remove the back. Wash the glass if necessary. Place the photo or artwork in the centre of the frame and close it. Use the hanging system supplied with the frame to attach it to a wall or table.
Double glass frame:
Turn the frame over and remove the small wooden border at the back. Carefully pick up the bottom pane and remove the demo photo. Wash the panes. Put two pieces of double-sided tape on the back of the artwork/photo, at the top, and stick it to the back glass, making sure it is centred and straight. Replace the glass, making sure the frame is correctly oriented, noting the location of the saw tooth. Replace the border and close the frame. Place a nail or flathead screw on the wall and hang the frame.
Floating frame for canvas:
Insert the canvas into the frame, then turn the frame over. Attach each side of the canvas, starting from the frame and ending with the canvas's faux frame. Install the hanging system of your choice (wire or sawtooth), then hang on the wall.
Our framing specialists recommend:
- 1" screws (especially for our recyclo™, floating and CPE frames)
- offset clips (available at the framing counter and also in packs of 100 and 1,000)
Regular frame for canvas:
Turn the frame over and place the canvas (mounted or cardboard) in the opening. Secure each side of the canvas. For a mounted canvas, secure at an angle, and for a cardboard canvas, secure parallel to the canvas. Install the hanging system of your choice (wire or sawtooth) and hang on the wall.
Our framing specialists recommend:
- 1" screws (especially for our recyclo™, floating and CPE frames)
- offset clips (available at the framing counter and also in packs of 100 and 1,000; these clips are also suitable for frames with a Marie-Louise)
*These various installations can be done in-store for a small fee. Assembly kits are also available in-store.
HOW TO INSTALL A FRAME AT HOME
Installing a frame on a wall:
Before installation, determine where the frame is to be placed on the wall. Next, attach a sheet of paper or tape to the wall (to avoid dirtying it) and draw a horizontal guide line on it using a lead pencil or pen, along the top of the frame from corner to corner. Then find the centre of this line and draw a vertical line.
Turn the frame over and measure the distance from the top of the frame to the hanging system, where the nail will be. Transfer this measurement to the wall, along the vertical line. Nail in the designated place, then erase all the lines. Finally, hang the frame on the wall.
*You can also draw your guide lines directly on the wall using a lead pencil.
How to install a sawtooth hook:
Find the centre of the frame and draw a guide line on the back of the moulding. Centre the sawtooth hook on this mark and nail it in place. The small teeth should face the bottom of the frame. Install a headed nail on the wall and hang the frame on it.