There’s no magic formula for drawing like a mangaka. It’s all about practice and using a wide variety of methods to create an equally wide variety of characters – that’s the beauty of the manga world.
To make it easier for you, O-TAKU prepared a guide with all the basics to get you started … and then create your own characters!
Step 1: Create your "construction lines"
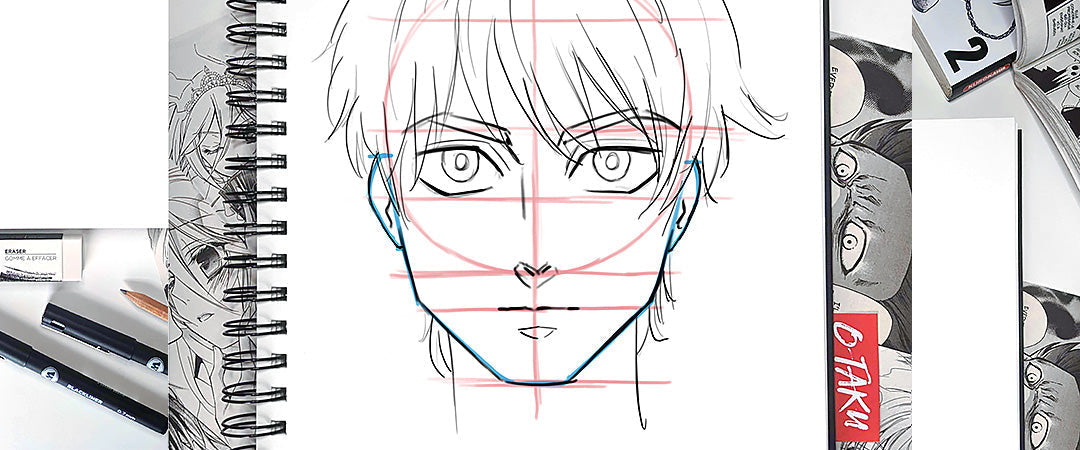
To begin, it's best to create construction lines that will serve as a guide for placing the different elements that will make up the face: the eyes, the nose and the mouth. 
1. Draw a circle. It doesn't have to be perfect, because a face isn't perfectly geometric. To give you a real anatomical reference, the circle represents more or less the back of your skull.
2. Draw the axis of symmetry that cuts the face in half.
3. Cut the circle in half to define the axis on which your eyebrows will be drawn. Draw a line where the bottom of the circle meets the axis of symmetry; this defines the location of the nose and will also serve as a guide for drawing the ears.
4. Draw another line at a distance slightly less than the spacing between the two axes you've just created. This chin mark is where you'll define the length of the face.
5. Place a mark under the nose mark, one third of the way between the two marks. This line will be found at the opening of the mouth and will help you to draw the shape of the face.
6. Start from the first line and work your way down, then shape the jaw and chin on the last line.
7. Draw the two lines that will serve as the axis for placing the eyes. It's with these lines that you can add personality to your character's face by playing with the length, height and thickness of the eyes. Here, I used a standard format.
8. To place the ears, you can use the line at the top of the eyes and go down a little further than half the space between the eyes and the tip of the nose, then add the details that make up the ears.
Step 2: Draw the eyes
As mentioned earlier, it's through your character's eyes that you can begin to give it a personality.
1. Place vertical markers to define a box for each eye. Tip: imagine the distance of one eye between the two eyes.
2. Make the shape of the upper eyelid and the outer corner of the eye. If necessary, create additional markers to help you achieve symmetry.
3. Draw the lower structure line of the eye. Be sure not to forget the small line that completes the outer corner.
4. Draw a circle to define the iris. You can play with the size of the irises to express your character's personality. Large irises for soft characters, small irises for a more worried look, for example.
5. Add the pupil, light reflections, eyelashes and any other details you want … and don’t forget the eyebrows!
BONUS: To play with the intensity of your character's eyes, you can change their slant, thickness and length (as shown in these three examples).
And don't forget that there are many different eye styles, in many shapes and sizes, which are also based on emotions and the intensity of those emotions.
Step 3: Nose and mouth
In manga drawing, when creating the nose and mouth, we mainly focus on volume shading and details such as nostrils or the cupid's bow.
Here are three examples of common manga representations.
The first one is very basic, the second one uses the shape of the lip and the shadow on the side of the nose, and finally, the last one focuses on volume shadows on the tip of the nose and the two lips.
Step 4: Final assembly
Once you've selected the different elements discussed below, you can assemble the face. There are still many steps involved in really mastering the art of drawing manga faces, such as emotional expression, hair, shapes, etc.
Here are some examples to give you an idea of what you can achieve!


