


- Empty candy or mint tin
- Plastic wrap
- 6 tubes of watercolour paint
- Waterbrush reservoir paintbrush
- Fimo or Sculpey
How to build the perfect pocket palette
Step 1: Soften the polymer clay in your hands and push it into the bottom half of the tin, smoothing it out. If the bottom of your tin is plastic you will not be able to bake the clay inside the container. Line the tin with plastic wrap before moulding the clay, this will allow you to easily pop the clay out before baking it. Do not bake the plastic wrap.
Step 2: Using the bottom end of a marker (or another small round shape), make six deep indentations in the clay.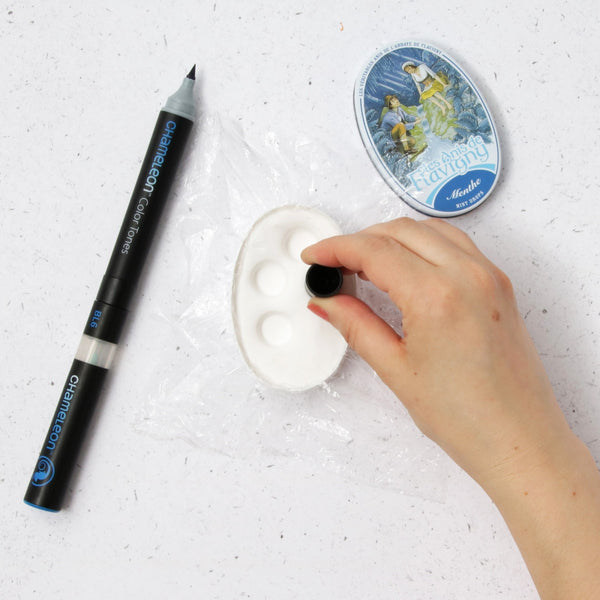
Step 3: Gently pop the clay out of the tin and bake it in the oven as per the packaged instructions. Once the clay has cooled, place it back into the bottom of the tin. If it is a little loose it can be secured in place with super glue.
Step 4: Squeeze paint into each one of the wells until they are full. To make a versatile 6 colour palette chose Shinhan watercolours in the following colours:Ultramarine deep
- Cerulean blue
- Permanent rose
- Burnt umber
- Raw sienna
- Permanent yellow light

Step 5: Leave the paints to dry in a dust free area. To use, simply spray the palette with water to activate the paints or apply a wet paintbrush. Reservoir brushes are an ideal companion to this travel kit as they stay wet.
Tips:
Smooth fingerprints and dust from your raw clay with rubbing alcohol and a cotton swab before baking
Cut sheets of watercolour paper to fit inside the lid of the tin
