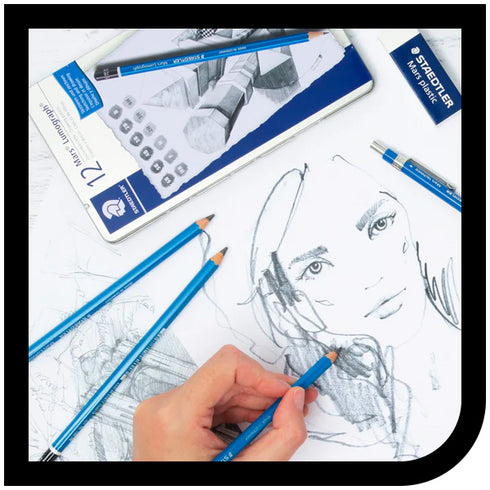


Drawing convincing skin may seem like a skill that only an expert can master … not anymore! Our collaborator Christelle Bilodeau guides you through all the steps of a technique she personally developed over the years to create realistic skin, without going into too much detail. Also, feel free to add your own personal touch to her technique!
- Hard lead graphite pencil (3H or 2H)
- Graphite pencil (H or F)
- Graphite pencil (B)
- Bolder graphite pencil (HB, B or 2B)
- Darker graphite pencil (B or 2B)
- Blending stump
- Tombow® Mono Zero Eraser (or another of your choice)
First, make sure your reference photo is of the highest possible resolution. If you can zoom in on the photo, it will be easier to create more detailed artwork. It can also be helpful to look at several photos of your subject.
Step 1: Skin base
To create the skin tone, use a previously used blending stump with a little graphite on it. This will help lightly tint your paper. As skin is never perfectly smooth and even, working in small circular strokes, in small dots using your blending stump, will allow you to create your basic texture.
Work on one small section at a time. By focusing on one area, it’s much easier to recreate as much detail as possible!

Step 2: Fine lines
Add fine lines with a harder lead graphite pencil (3H or 2H), as these lines should be subtle. The idea is to go easy on the lines and add them all around the section you're working on. Note that fine lines are not wrinkles, on the contrary, they are subtle lines that occur naturally on the skin.

Step 3: Skin pores
Using the same technique as for fine lines, add skin pores to the entire section you're working on by pressing very lightly on your pencil. It's important to go slowly, as pores that are too dark will look like blackheads and will not have the desired effect. Then, add depth with an eraser, as shown in the next step.

Step 4: Eraser
A good eraser is essential when working on skin texture. Use an eraser such as Tombow's Mono Zero and use a knife to shave it down to a chisel tip. This will add dimension to wrinkles, while adding subtle highlights to the skin. You can also use the fine tip to make some fine lines and pores.
Step 5: Wrinkles
Now it's time to tackle more pronounced wrinkles! However, make sure they’re not too dark. Very dark wrinkles will create depth, which can make your subject look older than they are.
Use an H or F pencil to draw the guideline, then a B pencil to darken certain sections.
A wrinkle is not just a straight line, there are always several small fine lines connecting to it. As in Step 4, use your eraser to add highlights and create a relief effect.


Step 6: Beauty marks, freckles
With a bolder pencil (HB, B or 2B), depending on the intensity level, recreate the general shape, then with a blending stump, soften the outline so that it blends with the rest of the skin.

Step 7: Shading
For darker sections of the face, where there is shading for example, use a dark pencil (B or 2B). Apply the pencil by pressing gently on the paper, crosshatch the area, and then use the blending stump. Then repeat the previous steps to add fine lines, moles, wrinkles, etc.
This technique may seem a little random, but remember that the aim is to recreate as accurate an image as possible without becoming overly realistic. Too much texture can create the opposite effect and make your portrait look plastic. The important thing is to recreate the general idea of the subject.
Now grab your pencils and get creative!

